Installation instruction of STONE PRODUCT COMPOSITE (SPC) FLOORING
一.The requirement of ground
1.Floorings should be paved after ground hidden works, ceiling works, metope engineering,water-power engineering are finished. There are not cross construction on the installation site.
2.The requirement of ground: The out of flatness of the basement ground should be within the range of 2 square meters. The high and low different should be less 3 millimeters. Otherwise, the self-leveling process should be used to make level.

二.Construction process
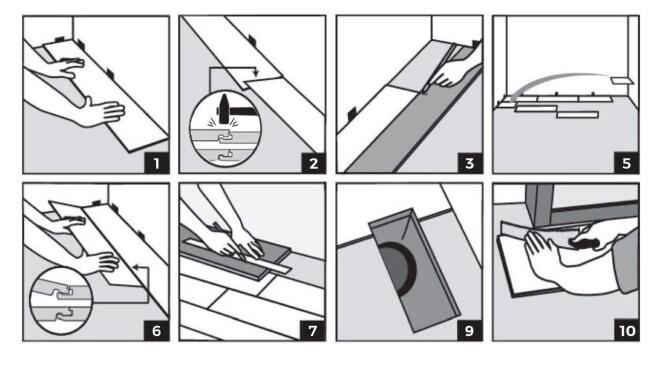
1. Once subfloor is fully cleaned and prepared, begin with laying planks left to right for first row. Place first plank so grooved edge is facing towards you. Place board 6mm (1/4") from left wall. Use spacers between wall and plank.
2. For the second board in the first row, lay the board interlocking with the first end-to-end and tap gently with a rubber mallet to lock firmly together. These should be same height if laid properly. Ensure both are perfectly aligned. Continue in same method towards right hand wall.
NOTE: If both boards are not same height or are not locked properly together follow the directions at bottom of guide of "TO UNINSTALL". Remove board(s) and check for debris obstructing the lock and grooves. If the end joints are not properly lined up, trying to force the boards together will permanently damage end joints.
3. For final board of first row ensure to measure length required to allow 6mm (1/4") gap for expansion between plank and right hand wall.
4. To cut board place facing upwards. Using a sharp utility knife and ruler, cut pushing firmly several times on the same line. This will not cut through the board, but will cut deeply. Then place one hand close to the cut and push down firmly, and use other hand to lift the other half of the plank. The board should split naturally at the cut mark.
5. Beginning the second row, use remainder of cut plank from last piece of first row, provided piece is minimum 30cm (12"). Otherwise cut a new plank to begin this row, ensuring joints are at least 18cm (7") apart. Use the remainder of cut planks for ends of rows to begin subsequent rows whenever possible.
6. Click together the long sides of the new plank and the one in the previous row, placing the board tightly to the short end of the previous plank in this row with an angle of 30°. Drop the plank, and tap gently with a rubber mallet to lock firmly together.These should be same height if laid properly. Ensure both are perfectly aligned.
7. After installing 2 or 3 rows check the straightness using a string line. If the planks are not running straight, it may be caused by unevenness in the starting wall. The first row may require to be re-trimmed to adjust accordingly.
8. For final row, lay a plank of SPC directly on top of last completed row. Place another board on top, touching the tongued side of the plank against the final wall. Trace a line along the edge of this piece marking the first board. Then cut along the edge of this piece to mark the first board. Cut using this line to get required width of board. Insert this cut board against the final wall. The final row should be a minimum of 5cm (2") in width. Spacers can then be removed.
9. When measuring for holes for pipes, use the diameter of the pipe and cut a hole 12mm (1/2") larger. Holes for pipes: measure the diameter of the pipe and drill a hole that is 1/2" (12mm) larger. Saw off a piece, and install the board around the pipe. Then lay sawed-off piece of board in place.
10. When installation is complete, replace moulding, allowing a slight clearance between moulding and SPC. Attach moulding to walls, not to the flooring. For areas where SPC meets other flooring types use T-moulding to cover exposed edges. Do not pinch SPC with moulding, and allow a small space between surfaces.

三.Matters of attention
1.Before paving, floorings should be placed at a constant tempreture environment about 24 hours to achieve the effect of size stability.
2. The ground is clean without any residue
3.About 8mm expansion joint should be reserved between the floor and wall(including fixed funiture). For rooms, which longer or wider than 8m, a 1-2cm expansion joint should be reserved.
Meanwhile, installing a T-moulding on there.


